Often photos that we want to put online have the wrong colors. Sometimes they're too dark or bright, or they have a wrong exposition, or a colour is dominating over the others. To solve the problem, there are many photo editing softwares functions, like
Auto Contrast in
Photoshop, or
Auto adjust colors in
Irfanview, or
Equalize ,
White balance,
Stretch contrast ,
Stretch HSV,
Color enhance,
Normalize of
Gimp.
I've been searching for a long time for a PHP script able to normalize image colors. The only noticeable program was
PHPThumb, which anyway is a complete package for thumbnails generation. Therefore I decided to write a simple script to implement the automatic regulation of the color:
Code of normalize_img.php
<?PHP

function normalize_img($immagine, $modo=2, $dinamica=254)
{

  ## Name: Normalize_img
  ## Description: PHP script for normalizing automatically the color in an image.
  ##              It uses GD Libraries.
  ## Copyright: Isacco Coccato - www.giacobbe85.altervista.org
  ## Version: 1.0

  ##############################################
  ### PART 1: RGB minimum and maximum search ###
  ##############################################

  # Variables initialization
  $red_min=255; $green_min=255; $blue_min=255;
  $red_max=0; $green_max=0; $blue_max=0;

  # Scans each image pixel
  for ($x=0; $x<imagesx($immagine); $x++)
  {
    for($y=0; $y<imagesy($immagine); $y++)
    {
      # Computes RGB for the current pixel
      $pixel_corrente=imagecolorat($immagine, $x,$y);
      $red = ($pixel_corrente >> 16) & 255;
      $green = ($pixel_corrente >> 8) & 255;
      $blue = $pixel_corrente & 255;

      # Searches for the minimum
      if($red<$red_min) $red_min=$red;
      if($green<$green_min) $green_min=$green;
      if($blue<$blue_min) $blue_min=$blue;

      # Searches for the maximum
      if($red>$red_max) $red_max=$red;
      if($green>$green_max) $green_max=$green;
      if($blue>$blue_max) $blue_max=$blue;
    }
  }

  #######################################
  ### PART 2: normalization algorithm ###
  #######################################

  # Normalization with method 2
  $sposta_r = $red_min;
  $sposta_g = $green_min;
  $sposta_b = $blue_min;

  if($red_max!=$sposta_r) $scala_r=$dinamica/($red_max-$sposta_r); else $scala_r=1;
  if($green_max!=$sposta_g) $scala_g=$dinamica/($green_max-$sposta_g); else $scala_g=1;
  if($blue_max!=$sposta_b) $scala_b=$dinamica/($blue_max-$sposta_b); else $scala_b=1;

  # Normalization with method 1
  if($modo==1)
  {
    $sposta=min($sposta_r, $sposta_g, $sposta_b);
    if(max($red_max, $green_max, $blue_max)!= $sposta) $scala=$dinamica/(max($red_max, $green_max, $blue_max) - $sposta); else $scala=1;

    $sposta_r=$sposta; $sposta_g=$sposta; $sposta_b=$sposta;
    $scala_r=$scala; $scala_g=$scala; $scala_b=$scala;
  }

  #############################
  ### PART 3: Normalization ###
  #############################

  # Scans each pixel to normalize it
  for ($x=0; $x<imagesx($immagine); $x++)
  {
    for($y=0; $y<imagesy($immagine); $y++)
    {
      # Computes the RGB values for the current pixel
      $pixel_corrente=imagecolorat($immagine, $x,$y);
      $red = ($pixel_corrente >> 16) & 255;
      $green = ($pixel_corrente >> 8) & 255;
      $blue = $pixel_corrente & 255;

      # Computes the normalized pixel and saves it in the image
      $colore_pixel = imagecolorallocate($immagine, ($red-$sposta_r)*$scala_r, ($green-$sposta_g)*$scala_g, ($blue-$sposta_b)*$scala_b);
      imagesetpixel($immagine, $x, $y,$colore_pixel);
    }
  }
  return 1;
}

?>
The function works directly on the image. It returns 1 if the operation was successful. It can be used in this way:
normalize_img( image resource, method, dynamic)
The variables are:
- Resource image: an image resource from a GD library, created for example with imagecreatefromjpeg().
- Method (optional): it determines the normalization method (see below for further details). It can be 1 or 2. Default is 2.
- dynamic (optional): it determines the normalization extension, that is the distance between the brightest and the darkest pixel. It's a value between 0 and 254. Default is 254. The smaller this value is, the darker the image will be.
A code example is:
Code of function_usage.php
<?PHP
$mia_img = imagecreatefromjpeg("pippo.jpeg");
normalizza_img($mia_img, 2, 254);
header("Content-Type: image/png"); imagepng($mia_img);
imagedestroy($mia_img);
?>
How it works
This function uses the GD libraries, which therefore must be present on the server. There's no object oriented programming, and can be divided in three parts:
- Image reading: per each pixel the RGB values are obtained. Among all the pixel values the smallest one and the biggest one are searched.
- Normalization: by using one of the two different algorithms, called 1 or 2 and user selectable, the parameters to perform the normalization are computed.
- Writing: the pixels are recomputed and written in the GD image resource. The image is therefore normalized.
Note that the relative data about each pixel is not saved in a vector, but is read directly on the fly, in order to save RAM memory. Anyway, this function was designed for images smaller than 1000x1000 pixels.
Normalization methods
According to the image type, this function offers two normalization methods:
- Method 1: similar toNormalize in Gimp.
It modifies the colors in order to make the brightest point in the image as bright as possible, and the darkest point as dark as possible. The parameter dynamic sets the distance between the brightest and the darkest points. This function normalizes simultaneously the three RGB channels, and therefore it doesn't modify the image hue (that is, for example: if the image is dark and red, after the normalization it still will be red, but brighter).
- Method 2: similar to Contrast stretch in Gimp. It performs the same operations as the method 1 (normalization), but it operates on the three RGB channels separately. It means that per each channel it there will be in the image a white pixel (0) and a black pixel (255). The difference with the normalization is that these minima and maxima for the RGB channels are not in the same pixel. As final result the predominance of a color is deleted.
The two methods have pros and cons, and must be chosen according to situations. Let's see the case of a landscape image, taken on sunset with a webcam, and therefore with a bad exposure:
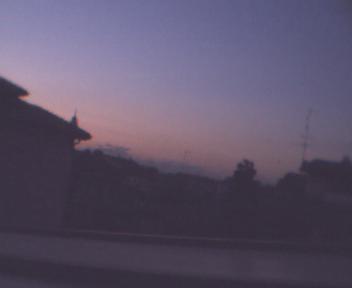 |
Original image
The file was saved from the webcam as a Jpeg, and therefore is lossy. We can note that the photo is under-exposed, that is, dark.
|
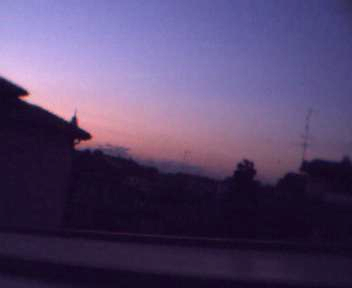 |
Method 1
(Normalization)
The photo is brighter, bur it keeps its red hue as in the original image: the ratios among the RGB channels didn't change.
|
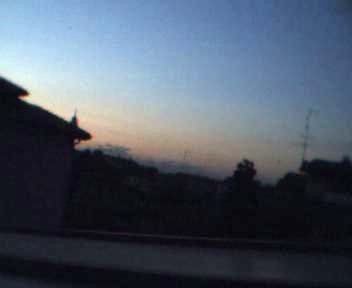 |
Method 2
(Contrast stretch)
The photo is brighter and it lost its red hue: the ratios between the RGB channels changed.
|
Happy normalization!